Showing posts with label Recipes. Show all posts

8.14.2015

Friday Favorites

I spent the last two days at New Teacher Orientation being fed an abundance of information about the new district in which I would be teaching. Because I am not brand new to teaching, I was not required to attend the third day of NTO today. Instead, I took my time getting up and getting ready this morning. I went to Target and then to Office Depot to pick up a few things for my classroom--won't be the last trip, that's for sure! Once I found most of what I wanted, I headed to my classroom to work for a little while. I got quite a bit done today, but I still have lots to do next week during Staff Development. So, no pictures of the classroom today, but instead, I am going to share some of my current favorite things.

[one]
We have lived in our new house for a little over a month now, and we are finished decorating for the most part. My first room to completely finish, our dining room, ended up being my favorite.
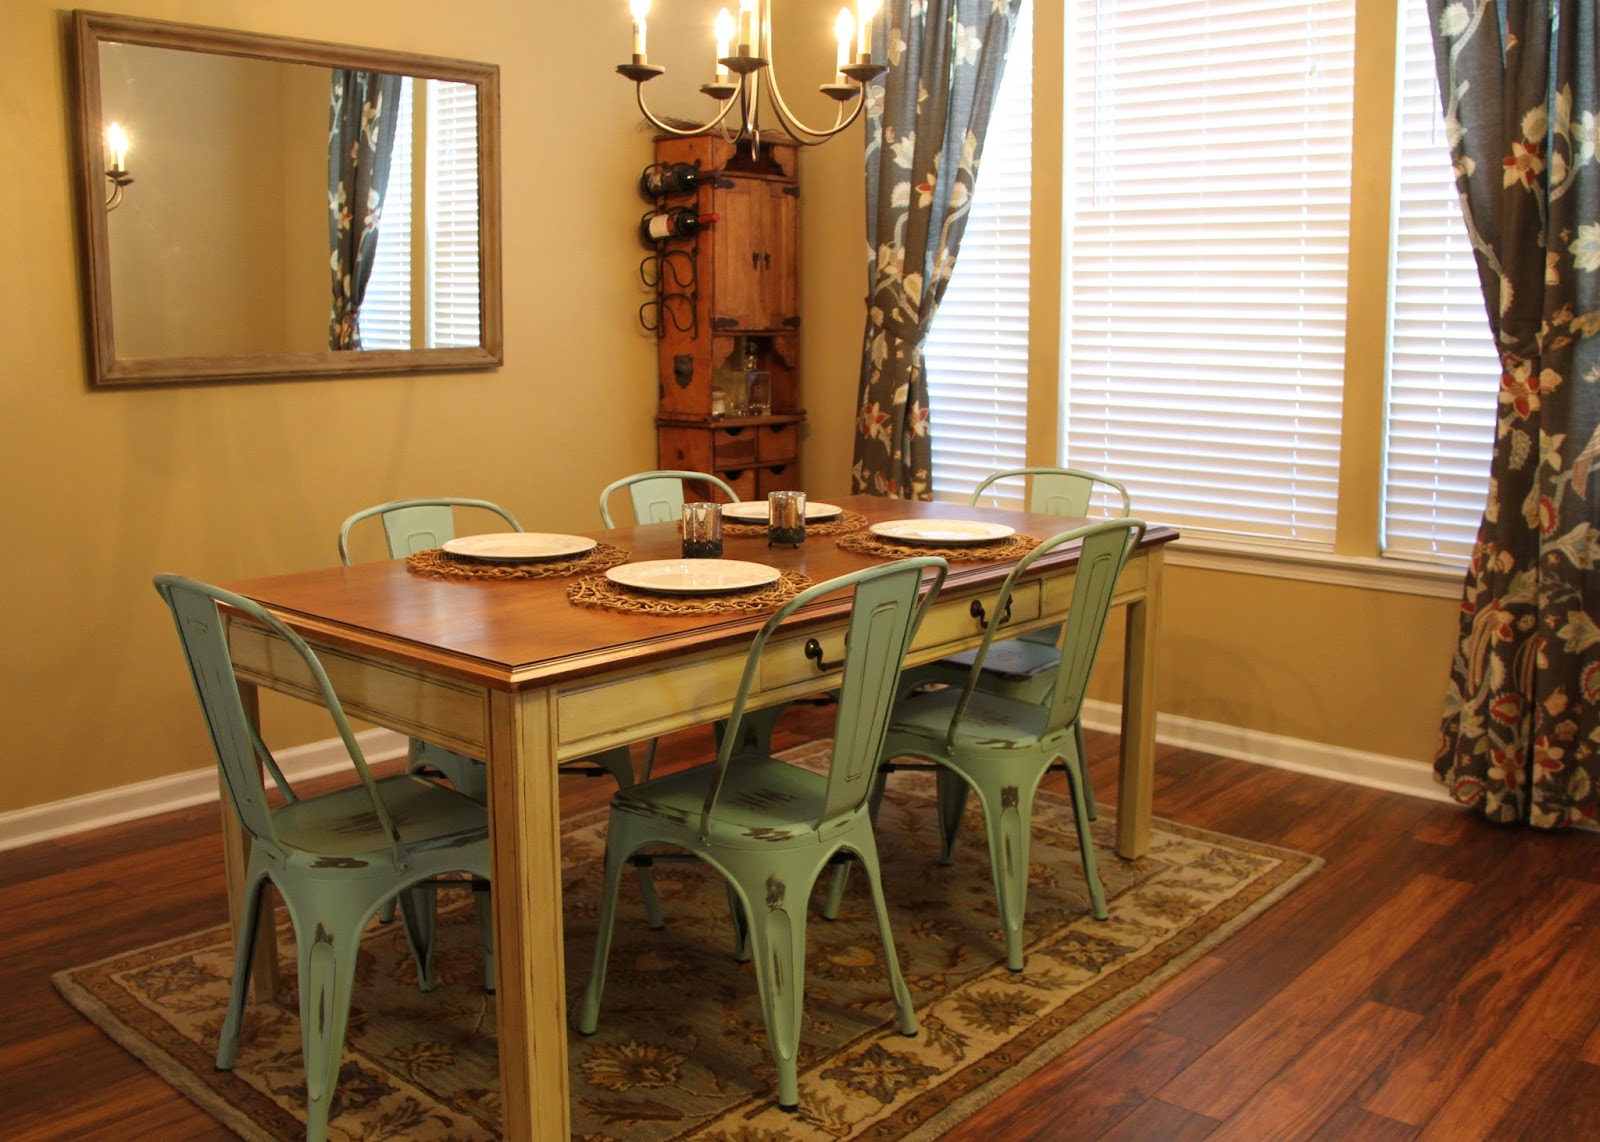
I am already looking forward to breaking bread many times with many different people in this room. The mirror on the wall makes the space look double its actual size. You may remember this mirror makeover from here. We found these curtains at World Market. Matt didn't want us to buy curtains in our old apartment, because he knew it was very temporary, so I could not wait to get curtains in our new place! These have hints of sky blue that match our chairs. 


I searched long and hard for the perfect metal chairs to go with my $20 table. I finally found the kind I was wanting at a great price from Cymax. They even shipped free (and super quick!). 


The picture on the left is one of my favorite pieces of furniture. It's our little mini-bar. It was the first piece of furniture Matt and I picked out together. We got it at an antique store while we were in Gruene for our first married Christmas. The picture in the middle is of the wall between our dining room and our kitchen. This chalk board was actually already there, and I have loved getting to write (and menu plan) on it. The picture on the right is another one of my favorite pieces. It is a butcher block that was given to me by my grandparents, and I vividly remember my grandmother using it in her kitchen when I was a child. 

Everything in our dining room has a story. Each piece brings back a fun memory. I LOVE our dining room! 

[two]
I am loving our new welcome mat! I threw out our old one before we moved, because it needed replacing. However, I couldn't find a welcome mat that I really liked. It was important to me because it is one of the first impressions of someone walking into your home, so I wanted it to actually serve the purpose of being welcoming. Well, I found one, and I am obsessed! I saw it online at Target, but shipping is not available and when I first saw it, you couldn't pick up at any of the stores nearest me. BUT, on my latest journey to Target, the welcome mat and I locked eyes. It was love at second sight! Do you love it as much as me?!? It's really okay if you don't... but HELLO, it's so stinkin' cute!!

[three]
I love watching The Today Show in the mornings, and because it's summer, I have been able to watch it more than just until 7:15am. It has been wonderful! They have these recipe segments, and one morning, they were talking all about zucchini. We have been really into zucchini lately (along with the rest of the world, apparently). They shared this recipe for Zucchini Boat Pizzas a couple of weeks ago, and I finally made it, and WOW-EE it's delicious!! I may have to share the recipe on a later post, because it is definitely one to try!

[four]
Last, but absolutely not least, my favorite thing right now is my sweet girl, Avery. While Matt has been at school, she has been there with me. We've gotten to spend lots of time together, and I know she will be just as sad as me to see me go back to work. 
Oh good grief, that face! How am I supposed to get anything done around here?! 

Happy Friday, friends! Hope you have a wonderful weekend!

4.15.2015

Chicken Salad

Y'all, my husband speaks the language of food. Thankfully, I have learned to speak that same language. One of his F-A-V-O-R-I-T-E foods/snacks is chicken salad, but I always cringe at buying the pre-made, grocery store chicken salad, because it's a little container that costs about $9. With hubs, that whole container may last about 9 minutes. So, whenever I find new recipes for chicken salad that are clean, or at least somewhat clean, I like to give them a try! I'm know I've said this before, but this recipe really is a new favorite! It tastes so refreshing. Here's the recipe:

Chicken Salad
Ingredients:
1 1/2 cups cooked chicken, cubed
1 large green apple, diced
1 large red apple, diced
1 1/4 cups red seedless grapes, halved
2 celery stalks, diced
1/2 cup walnut pieces (I used pecans because that's what I had)
2 tablespoons litem mayo
2 tablespoons dijon mustard
2 tablespoons plain greek yogurt
1 teaspoon honey
Salt and pepper to taste
Lettuce leaves for serving

Directions:
Mix all ingredients chicken through the walnuts in a large bowl. In a separate bowl, whisk together the lite mayo, dijon mustard, greek yogurt, and honey. Pour the mixture into the bowl with the chicken and fruit and toss until evenly coated. Serve on lettuce leaves.

Enjoy!

3.19.2015

Summery Chicken Tostadas

Since this recipe was shared with me about a month ago, I have made this dinner twice. It is definitely a hubby-approved fave! A friend of mine over at Fit Foodie Fam blogged this recipe and shared it with one of our 21-Day Fix groups. And let me just tell you, SO yummy, SO colorful, and SO easy to put together. Here's the recipe:

Summery Chicken Tostadas
Ingredients:
-1-2 cups cooked, shredded chicken (my fave crockpot shredded chicken recipe below)
-1 teaspoon EVOO (or other oil of your choice)
-1 zucchini, diced
-1 red onion, diced
-4 whole wheat tortillas (my fave are the Mission Artisan brand)
-1 cup corn kernels (I use frozen, but fresh is fine!)
-1 teaspoon ground cumin
-1/2 teaspoon garlic powder
-3-4 tablespoons salsa verde
-3/4 cup shredded cheese (I use Monterrey Jack if I have it, but anything is fine!)

Directions:
Preheat over to 400 degrees.

Heat oil in a skillet over medium heat. Add zucchini and red onion, stirring often. Continue to sauté these ingredients for about 8 minutes or until the onions are soft.

While the zucchini and onion are cooking, lightly spray both sides of your tortillas with cooking -spray, and lay on a baking sheet. Bake these in the oven for about 8 minutes or until they begin turning a golden color. (Be careful not to burn them.)

After the onion and zucchini are soft, add in the corn and stir. Let the corn heat all the way through, and then add in the spices and salsa. Stir all ingredients together. Then, add in the chicken to the vegetable mixture and stir to combine.

By this time, your tortillas should be done. Take them out of the oven, and top each tortilla with about 1/2 cup of the chicken/veggie mixture. Sprinkle cheese on top and return to oven to allow cheese to melt.

Serve with desired toppings, such as avocado, cilantro, or more salsa verde.
Let me know if you try this recipe! Would love to know how you like it!


Also, here's the shredded chicken recipe I use...

SkinnyTaste Convenient Slow-Cooker Shredded Chicken
Ingredients:
-3 boneless, skinless chicken breasts, trimmed of all fat (about 1.5 pounds)
-3 cups Swanson 33% less sodium chicken broth
-1 onion, quartered (optional)
-1 celery stalk (optional)
-1 sprig of fresh parsley (optional)

Directions:
Combine chicken breasts, just enough broth to cover the chicken and onion, celery and parsley (if using) into the slow-cooker. Cover and cook on high for 4 hours.

Remove chicken and shred with two forks. Discard the remaining liquid and veggies. You can use the shredded chicken in any recipe that calls for it, or refrigerate it for up to 3 days.

1.02.2015

No-Bake, Guilt-Free Cookies

If you are like me, you have a major sweet tooth. I try not to bake much, because I know I will just want to eat whatever I bake. It's a vicious cycle, you see, especially trying to eat clean. Here's a recipe that allows guilt-free sweet eating.

No-Bake Shakeology Cookies
Serving Size is 1 cookie

Ingredients:
- 1 cup Chocolate Shakeology
- 1 cup nut butter (I used almond butter)
- 1 cup quick cooking oats
- 1/2 cup agave nectar

Preparation:
- In medium-sized bowl, combine all ingredients, stirring well.
- Roll mixture into 20-24 balls, each about 1-inch in diameter, and place on cookie sheet lined with parchment paper.
- Press a fork into each cookie, creating a criss-cross. (I touched the back of the fork to flour before each press to make this step easier/cleaner.)
-Store in air-tight container, and enjoy!
*If you are doing the 21-Day Fix, one cookie = one yellow container*

If you don't have Shakeology, the healthiest meal of the day, no worries--you can get it here!

7.28.2014

Tomato Basil Spaghetti Squash Bake

This is one of those "don't knock it until you try it" recipes. After just typing that, I realize that sounds very negative and you may not want to try this recipe now, BUT keep reading. For real, this dish is one to try!

I found the recipe here, but as you may know if you have ever stumbled upon my blog before, I cook for TWO--hubs and me. So, whenever I see recipes that end in the word, "bake," that usually means it cooks in a 9"x13" baking dish, and we could eat on it for a week. So, I altered the portions a little to feed our little family of two. (Just don't tell Avery she wasn't included in that count.)

If you have never cooked spaghetti squash before, I also included directions on how I do it. Feel free to browse the web for other methods. I have heard you can use your microwave, but I would be terrified to try.

**Sidenote: I have always had a fear of something exploding in my microwave. Thankfully, it is NOT because of a past experience, just a fear. 

Tomato Basil Spaghetti Squash Bake
Ingredients:
-One spaghetti squash (on the smaller side)
-Olive oil
-Salt
-Ground black pepper
-Garlic Powder
-2 large tomatoes, sliced
-Onion Powder
-Dried Basil
-Dried Parsley
-3/4 cup of shredded Mexican cheese blend
-Fresh basil for garnish

Directions (for Spaghetti Squash only):
-The first thing you have to do is cook the spaghetti squash to get your "noodles" from it. The most difficult part of the whole thing, which happens to be the very first step, is cutting the darn thing in half, lengthwise. Be SO careful!! I've heard of people putting it in the microwave for fish minutes to help soften the squash a little bit.
-Once it is cut, with a spoon, scoop out the seeds from both halves.
-Preheat your oven to 375 degrees.
-Brush each of the insides with olive oil, and season with salt and pepper. I like to sprinkle a little garlic powder here, too, because we love garlic. Feel free to omit. You can't mess this part up.
-Place halves face down on parchment-paper lined baking sheet and roast in the oven anywhere from 30-50 minutes, depending on the size of your squash. You want a fork to puncture through the flesh of the squash easily, and then you know it's done.
-Remove squash from the oven and allow to cool a few minutes. I am usually too anxious and just handle the squash with oven kits anyway. Whatever your patience-level is here, I am not judging. :)
-With a fork, scrape out the insides/flesh of each half and set aside in a small bowl.

Directions:
-Once you have cooked and set aside the spaghetti squash, change your oven's temperature to 350 degrees.
-Spray an 8x8 baking dish with cooking spray.
-Spread 1/3 of the spaghetti squash on the bottom of the baking dish.
-Top with a layer of sliced tomatoes.
-Sprinkle with salt, garlic powder, onion powder, dried basil, and dried parsley.
-Top the spices with 1/3 of the cheese.
-Add another layer of each: spaghetti squash, sliced tomatoes, spices, and cheese.
-Top with a final layer of squash.
-Then top with the remaining cheese, and sprinkle spices one more time.
-Bake, uncovered, for 30 minutes.
-Top with fresh basil before serving.

Enjoy!!

6.30.2014

Quinoa Chicken Parmesan

I am always on the hunt for new recipes. I ran across one that seemed very simple and that I already had all of the ingredients for, Quinoa Chicken Parmesan, so we tried it a couple of nights ago. It may sound a little strange, but the recipe is so easy and this dinner was really good! I found the recipe here.

Quinoa Chicken Parmesan
Ingredients:
- 1 cup dry quinoa
- 1 tablespoon Italian seasoning
- 4 boneless, skinless chicken breasts
- Salt and pepper to taste
- 1 cup all-purpose flour
- 2 large eggs, beaten
- 1/2 cup shredded mozzarella cheese
- 1/2 shredded Parmesan cheese
- 1 cup marinara sauce (I used Prego)

Preparation:
- Preheat oven to 400 degrees.
- Lightly spray a baking sheet with cooking spray.
- Cook quinoa according to package, and then stir in Italian seasoning.
- Take each chicken breast and cover completely with flour, dip into the eggs, then cover completely with quinoa, making sure the entire chicken breast is coated.
- Repeat with each chicken breast and place each onto the baking sheet.
- Place in the oven and bake for 25-30 minutes, or until golden brown.
- Remove chicken and top with cheeses and marinara.
- Then bake for another few minutes until cheese has melted.

Let me know if you get a chance to try it! I'd love to know how you liked it!

For the past couple of months, I have been working through a combination of BeachBody programs, P90X and 21-Day Fix. I am on Day 15 of 21-Day Fix, and I still think it is awesome! I am a big proponent of planning out your meals and staying away from last minute (usually unhealthy) decisions about what to eat. I have also loved having the little containers to help me with portions. But most of all, I have LOVED the workouts. Even Matt has gotten into them, and always says, "Okay, so which one are we doing today?" Yes, WE! It is fun being able to work out at home, but it makes it even more fun that he wants to do it with me!

Here we are sweating it out during Pilates Fix (which he found out is not just "light stretching"). 


Here is what I did the last two weeks:
Day 38: Upper Fix
Day 39: Lower Fix
Day 40: Pilates Fix
Day 41: Cardio Fix
Day 42: Dirty 30
Day 43: Yoga Fix
Day 44: Total Body Cardio Fix & Pilates Fix
Day 45: Upper Fix & Cardio Fix
Day 46: Lower Fix & 10 Min Abs
Day 47: Pilates Fix & Total Body Cardio Fix
Day 48: Rest
Day 49: Dirty 30
Day 50: Yoga Fix
Day 51: Total Body Cardio Fix

Friday was not intended to be a rest day, but we were both exhausted. I had been doing double day workouts for a few days, so my body just needed to rest. So, we propped up our feet and relaxed for the night... all three of us :)
Hope you have a happy Monday and a great rest of the week!

6.27.2014

Strawberry and Blueberry Trifle

Have you started planning your holiday menu? More importantly, are you trying to plan your holiday menu while also trying to "watch what you eat" at the same time? Hey, it happens. I have you covered for dessert. 

For the Fourth of July last year, we made this festive, light, but oh so delicious dessert. Best part was how easy it was! The hardest part (which was really just time-consuming, not difficult) was slicing the strawberries the way I wanted them to look. But really, I was just being a diva...nothing new. With ingredients so pretty, you can't mess it up! You also don't have to feel too guilty about indulging in a small somewhat oversized bowl of this yummy goodness. I found the recipe here.

Strawberry and Blueberry [God Bless the USA] Trifle
Ingredients:
- Angel food cake, cut into 1 inch cubes
- 2 pints strawberries, sliced to your liking :)
- 2 pints blueberries
- 6 tablespoons fat-free sweetened condensed milk
- 1 1/2 cups cold water
- 1 package sugar-free white chocolate instant pudding mix
- 12 ounces fat-free frozen whipped topping, thawed
Preparation:
- Bake angel food cake according to instructions, and set aside to cool, then cut into 1-inch cubes
Note: I did not use any of the "crust" of the cake, only the insides. And, if the cubes are more like crumbles, perfect :)
-Wash your fruit and slice your strawberries.
- In a medium bowl, whisk together the condensed milk and cold water.
- A little at a time, whisk in the pudding mix (until mixed well), and let sit for about 2 minutes, or until soft-set.
- Fold in the thawed whipped topping.
- Arrange half of your cake at the bottom of a 14-cup trifle dish.
- Sprinkle the cake layer evenly with a layer of blueberries.*
- Spread half of the cream mixture over the blueberries. *
- Top the cream with a layer of strawberries*
- Then repeat with layers of the remaining cake, then the blueberries, and the cream.*
- To finish off the top, arrange your strawberries and blueberries in a pattern (or not) :)
- Cover with plastic wrap, and refrigerate.**

* When spreading each layer, be mindful as to how your cake looks on the edges. It's the most important part, aside from the top :)
**Refrigerate at least one hour before serving.

The last step... and most importantly, ENJOY!
Enjoy the dessert and enjoy your holiday!

6.10.2014

Edamame Quinoa Salad

Before we get to the recipe...

This past weekend was the first weekend of summer, and I got some much needed R&R. Matt was traveling through South America for work, so Avery and I had a date on Friday with the vet. We had been wanting to get her microchipped, even though she is an inside dog. But, inside dogs get out, too-- you really never know what could happen. And as you can probably tell from reading any one of my posts, Avery is a very important part of our little family of three. Anyway, since it was time for another round of shots/check-up for her, I added 'getting microchipped' to the list of things that we wanted to have done at that appointment. We have been to the vet's office a lot--I mean, as much as any other two and half year-old dog needs to have been to the vet, and every time, she has loved it! Except for this time. For some reason, she hated it! At one point, she literally jumped on my chair and tried to hide behind me. Poor thing!


Finally, though, she was microchipped. Officially! Now, if anything were to ever happen to her and she is lost/found by someone else, any vet's office or shelter will be able to contact us. Money VERY well spent if you ask me! She was still pretty apprehensive about the whole scenario, however. She hid and barked the whole time until we were out the door. 

Once all of that was over, I decided to pack up with Aves and head to the bay. It was the perfect recover-from-the-last-week-of-middle-school-before-summer weekend and the perfect start to summer. Saturday night was Galveston's monthly "Art Walk," where various galleries feature artists and stay open to the public later than normal. There were a few restaurants with live entertainment and some other fun things going on. We had never been, so we decided to check out a local restaurant (called Press Box) that we had never been to and then explored the Art Walk.


On our way back to Houston, my mom and I decided we wanted to try some new recipes that we had seen in the Better Homes and Gardens magazine, one of the many read while laying on the beach. Edamame Quinoa Salad. Is your mouth watering yet? It is the perfect mixture of a light side dish, but that is filling at the same time. It also screams summer because of the lime juice. Definitely a must-try! Here is the original recipe that I altered only slightly. I actually do not like cilantro. I realized it when I was in high school and ordered the BBQ Chicken Salad from CPK, which is delicious, but had a strange after taste that I could not stand... cilantro. So, there ya have it. Therefore, I opted out when making mine...

Edamame Quinoa Salad
Ingredients:
- 1/2 cup dry quinoa, rinsed
- 1 cup frozen shelled edamame, thawed
- 1 cup frozen corn, thawed
- 1/2 cup cherry tomatoes, halved
- 1/4 cup lime juice
- 2 T EVOO
- About 1/4 tsp Salt (or to taste)
- About 1/4 tsp Pepper (or to taste)
*Optional- 1/4 cup fresh cilantro, chopped

Instructions:
-Cook quinoa according to package, and set aside.
-In a large bowl, combine edamame, corn, and tomatoes.
-Add in the cooled quinoa.
- Mix in lime juice and olive oil.
-Season to taste with salt and pepper.

**The only reason we used red quinoa was because they were out of white. While maybe not quite as easy on the eyes, it still tasted delicious!


Let me know if you have a chance to try it and what you think! 

5.28.2014

Avocado Basil Pasta

Summer is close. I mean REALLY close! I can taste it. Well, maybe I can't really taste it, but I have a recipe for you that really does taste like summer. There are plenty of delicious, but heavy, pasta dishes for the winter-time that make you feel all warm and fuzzy. This is not one of those pasta dishes. This one is really a taste of summer. The best part? It is so easy! It is a quick weeknight meal or a great dish to take to a BBQ. I made this on Monday night, and there was plenty leftover for lunches on Tuesday! This is the recipe altered from here...
Avocado Basil Pasta
Ingredients:
- 14.5 oz dried bow tie pasta
- 2 medium/large avocados, halved,  
  seeded, peeled, and chopped
- 2 medium ripened tomatoes,
  chopped
- 6-8 slices of turkey bacon, cooked
  until crispy, crumbled
- 1/2 cup chopped fresh basil
- 2 tablespoons lemon juice
- 1 tablespoon olive oil
- 3 cloves minced garlic
- 1/4 teaspoon ground black pepper
- 1/8 teaspoon salt
- 1/2 cup shredded parmesan cheese

Instructions:
- Cook the pasta according to the
  package instructions.
- While you are letting the
  pasta cook, chop everything that needs chopping, and cook your bacon.
- When pasta is cooked, rinse and set aside.
- In a large mixing bowl, combine avocados, tomatoes, bacon, basil, lemon juice, olive oil, garlic,
  pepper, and salt. Then, add the pasta and toss to combine.
- Pour the mixture into a serving bowl and sprinkle with parmesan cheese.

Enjoy warm or cold after refrigerating!
Makes great leftovers!

Tonight, I made another one of my favorite dinners--Asian Lettuce Wraps. I shared the recipe back in January here. Man, these are good! This is another recipe that makes lots, so there are lots leftover!
What do you have cooking this week?

P.S.  6 more school days until summer... just in case anyone else is counting!

5.05.2014

Cinco de Mayo | Chicken Enchiladas

Happy Cinco de Mayo!

Cinco de Mayo has always been a special day to me, and while I care quite a bit about the Battle of Puebla, it actually has nothing to do with why I love Cinco de Mayo. My mom's birthday is on Cinco de Mayo!! Yes, every year. And I love my mom a whole lot.

Another thing I love about this holiday is tex-mex. I mean, who doesn't love tex-mex? I wish I could say that we went out for some amazing Houston tex-mex or that I whipped up some incredible meal, but I actually wasn't feeling well, so neither of those things happened. However, last weekend was our Anniversary, and I made Matt's favorite meal, which happens to be chicken enchiladas that I feel ready to share with the world now. So, if you are looking for a new recipe to try that makes a whole lot, here is the recipe for you...

Chicken Enchiladas
Ingredients:
-4 chicken breasts, cooked and cut up/shredded
-10 (or more) tortillas
-16 oz. sour cream
-1 sm. can mild green chiles
-1 can cream of chicken soup
-1 lg. package shredded Monterrey Jack cheese
-1 [optional] onion

Instructions:
Combine all ingredients and fill tortillas (leave some cheese for topping.) Place in 9x13 baking dish coated with cooking spray. Cook for 30 minutes at 350 degrees. 

Serve with some yummy tex-mex side dishes! 


Let me know if you try this dish! Hope you love it as much as we do! 

And Happy birthday, Mom! I love you!

2.07.2014

[Baked] Zucchini Chips

The Family Fitness Challenge officially ended Tuesday night. I have not posted about my final thoughts, yet, because "Closing Ceremonies" (as my mom is calling them) are on Sunday night. So, more to come on the challenge in a couple of days.

For now, a recipe. If you are in desperate need of amping up your side dishes, try making these zucchini chips. My mom made them a couple of weeks ago, and they were so easy and delicious, I had to make them, too. If you ask me, zucchini can be a little non-exciting. I'm more of a squash-girl, and as I type that, I wonder why it seems that zucchini and squash are almost always paired together. Maybe its their shape? Or maybe it isn't true at all, and I have just always paired them together? But if we are being honest here, whenever I cook both together, I always tend to pick out the squash. Regardless, here is a recipe that makes zucchini so much better. Also, the smell of them cooking is delightful! Here is the recipe:

[Baked] Zucchini Chips:
Ingredients:
- 2 medium-sized zucchini, sliced
- 2 T olive oil (or grape seed oil--that's what I had)
- 1/4 cup Parmesan, shredded
- 1/4 cup dry, plain bread crumbs
- Salt and pepper to taste (it doesn't need much)

Instructions:
- Place zucchini slices in a sealable bag, and then pour in the oil. Shake the bag until slices are covered. Then, mix in all other ingredients and shake until all zucchini slices are covered with "the goods". Then place in a single layer on a cookie sheet (with cooking spray). Bake at 450 degrees for about 25 minutes.

Enjoy!

1.28.2014

Fitness Challenge || Weeks 3 & 4 Review

Even though I did not post a Week 3 Review, hopefully you saw what did happen in Week 3 here!

This has all been a really great experience and one that I would definitely recommend to anyone who is wanting to start a healthier lifestyle. It teaches you how to be more conscious about what you are putting into your body. Regardless of your weight loss, you feel better, your clothes fit better, and you hopefully will have a slew of new and healthier recipes that will hopefully take the place of some of your old ones.

With only one week left in our Family Fitness Challenge, there are still three of us that have full points,  with everyone else very close behind. I think it is safe to say that we have all won something with this challenge, even if it is feeling great about the changes that are made and will continue to be made.

Today is another "Snow" Day here in Texas. It is a whopping 32 degrees outside, and not snowing or sleeting or anything as of now. With all these days off of work, I have found more time to search for new recipes, and now that we are no longer cleansing, it is easier to find good ones that are still healthy. Here is one that I found, but then adapted a little for us last night. The best thing… lots of leftovers!

Turkey and Quinoa Enchilada Bake

Ingredients
-1 cup cooked qunioa
-1 package extra lean ground turkey
-1 green pepper, chopped
-1 onion, chopped (I like to use
  pre-chopped frozen onions because
  one of my least favorite things is
  chopping an onion)
-3 garlic cloves, minced
-2 (15oz) cans black beans, rinsed    
  and drained
-1 (16oz) salsa (I used black bean and
  corn)
-1 (15oz) can enchilada sauce
-1 (14.5oz) mexican stewed tomatoes
-1 teaspoon onion powder
-1 teaspoon garlic powder (or more)
-1 teaspoon ground cumin
-8 corn tortillas (I used blue corn/flax
  seed tortillas, Artisan brand)
-2 cups cheddar cheese, shredded
-1 avocado, diced or sliced

Preparation
-Cook quinoa according to package instructions. While quinoa is cooking, spray large saucepan with cooking spray. Cook turkey, green pepper, and onion over medium heat until turkey is browned. Add garlic, and cook for another minute. Depending on the meat you use, you may need to drain any grease. (If using extra lean turkey, you should not have this problem.) Then, stir in the black beans, salsa, enchilada sauce, stewed tomatoes, onion powder, garlic powder, and cumin, and bring to a boil. Reduce heat, and simmer for about 10 minutes. When qunioa is cooked, stir into the simmering meat sauce.
-Pre-heat oven to 350 degrees. Spray a 9in. x 13in. baking dish with cooking spray. Pour about a third of the meat sauce into the baking dish and spread over the bottom. Top with half of your tortillas. Spread another third (half of the  remaining) of the meat sauce over the tortillas, and spread. Sprinkle with 1 cup of cheese. Top with remaining tortillas and then remaining meat sauce.
-Cover with foil and bake at 350 degrees for 20 minutes. Uncover and sprinkle with remaining cup of cheese. Put back in the oven for about 10 more minutes or until you see the cheese bubbling on top. Serve topped with avocado (or sour cream if that is what you choose).

1.14.2014

Fitness Challenge || Week 2 Review

Two down, and three to go! …weeks, that is. It feels like this challenge has been going on forever, but it has only been 14 days. Oh well, I am feeling really great. I haven't been able to tell if that is a direct reflection of what I am putting into my body or if I am subconsciously feeling great because I know that everything I am putting into my body is super healthy. I may have just confused myself. Regardless, I haven't felt like I have been cleansing, which is the best way to cleanse. Amiright??

At this point in our challenge, we are able to add certain foods back into our diet. We are able to add small amounts of cheese and bread and other foods in moderation, but we actually have only had a little shredded cheese on one meal--Quinoa Stuffed Bell Peppers last night. I came to the realization that while I will eat bell peppers, I am definitely not in love with them. I was, however, in love with all the fixings inside of them. See the recipe here.


I also wanted to share two of my favorite recipes- one being my go-to green smoothie and the other, my favorite dinner recipe from this week.

Green Smoothie
-1 sliced banana (frozen)
-1/3 cup sliced strawberries (frozen)
-1/4 cup blueberries (frozen)
(I pre-package fresh fruit at the beginning of the week in freezer baggies.
That way, all I have to do is grab one from the freezer, and it is ready to go!)
-1 cup unsweetened almond milk
-1/4 cup vanilla greek yogurt
-1 tablespoon almond butter
(especially if I am drinking this as a meal- it helps me stay full)
-2 cups spinach leaves
(or however much it takes to fill the blender)


Asian Lettuce Wraps
1 cup quinoa (cook according to package--about 4 cups)
2 tablespoons extra virgin olive oil
1 cup chopped onion
1 (1.25 lb) package extra lean ground turkey
1/4 teaspoon salt
1/4 teaspoon pepper
1/4 teaspoon garlic salt
1 bag broccoli slaw
1/2 can drained and chopped water chestnuts
1/2 cup teriyaki sauce (the healthiest you can find)
1 package edamame (cooked according to package)
lettuce leaves for serving

Cooking Instructions
Pour olive oil in skillet over medium heat. Add onion and cook until softened. Add ground turkey, salt, pepper, and garlic salt. Cook until turkey is browned and cooked through. Once it is cooked, add broccoli slaw, water chestnuts and teriyaki sauce. Continue cooking for about 10 minutes. Add in cooked quinoa and edamame, and continue cooking for about 5 minutes. Reduce heat to low until ready to serve. Serve on lettuce leaves. (I had not added the quinoa when I first served my meal, but I quickly realized it would be even better mixed in with the other ingredients. Therefore, I did.)


Honestly, the hardest part of this week was being back at work. After full days of being on my feet teaching and then coaching and then after all the other extracurricular activities, and after cooking some "elaborate dinner", it is hard to be motivated to work out or run. Thankfully, hubs helps me out in that area. I never want to go run in the dark by myself, so he takes on the role of my protector/he makes me run faster. He's wonderful. Also, my dinners are really not elaborate.

I hope this update finds you in the middle of your own fitness challenge. I hope you are doing well and feeling great. I hope you are finding what motivates you. For now, I hope this motivates you…

"Be STRONG and COURAGEOUS. 
Do not be afraid or terrified because of them, for the Lord your God goes with you;
He will never leave you or forsake you."
Deuteronomy 31:6

8.06.2013

Pancakes and Pizza

Wow, is it really August already? Last week and this week, I went through GT Training through our school district, and while being busy getting ready for school and finishing up some professional development, I have been cooking a lot. Like a lot, a lot. One of my college roommates gave me my very first cookbook before I got married last year, The Pioneer Woman Cooks by Ree Drummond (pictured to the left).

Ree is awesome. I feel like I know her. She now has a new cookbook out there, and I cannot wait to buy it. First though, I am hoping to make my way through this one. I have already made many of the dishes that are in this book. Recipes are my friend. Have a mentioned that I am a math teacher? Or maybe it's the OCD in me, but if following a recipe to a tee is what makes a good cook, then you can call me a good cook. Unfortunately, I am pretty sure that doesn't count. Oh well. Here are two recipes that are a family favorite in the Bormann house--the first is from Ree's cookbook and the second is not...

Sour Cream Pancakes 
Ingredients
- 1 cup sour cream
- 7 tablespoons all-purpose flour
- 1 tablespoon sugar
- 1 teaspoon baking soda
½ teaspoon salt
- 2 large eggs
½ teaspoon vanilla extract
- Butter
- Maple or pancake syrup

Preparation
- Heat a skillet on medium-high for a couple of minutes to heat it up.
- Place the sour cream in a medium-sized bowl along with the flour, sugar, baking soda, and salt.
- Stir ingredients very gently, being careful not to mix too much. You want some texture.
- In a separate bowl, whisk the eggs.
- Add the vanilla to the egg mixture and stir.
- Pour the egg mixture into the medium bowl with all other ingredients.
- Stir gently.
- Add a tiny bit of butter to the hot skillet and follow by pouring the batter into the skillet about ¼ cup at a time.
- Cook for about 1-2 minutes and then flip pancake and cook for another minute. Repeat for as many pancakes as you can make with the batter.

These pancakes are really delicious! Don't let the sour cream ingredient freak you out. (AKA don't tell your husband they are called "Sour Cream Pancakes" before he tries them.) Also, just pretend they are healthy when you are eating them :) 

This second recipe is much healthier. It is not one of The Pioneer Woman's recipes, but it is still very delicious. I met up with some of my college roommates for a reunion dinner right after school got out back in June. We went to Tiny Boxwoods, and I ordered the Summer Peach and Balsamic Pizza, so I had to try to make it this summer for hubs and me. It is actually very easy.

Peach and Balsamic Pizza
Ingredients
- 2 whole wheat flatbreads as crust
- 1 cup balsamic vinegar
- 2 tablespoons olive oil
- 8 ounces fresh mozzarella, sliced
- 2 ounces soft goat cheese, crumbled
- 1-2 peaches, pitted and very thinly sliced
½ cup basil, julienne

Preparation for Balsamic Reduction
- Pour balsamic vinegar into a small saucepan and bring to a simmer over medium-high heat.
- Reduce heat to medium-low, and simmer until it has reduced to about ¼ cup.
- Set aside to let cool.

Preparation for Pizza
- Preheat oven to 375° F
- Lightly brush 1 tablespoon of olive oil on flatbread.
- Top flatbread with mozzarella, goat cheese, and peach slices.
- Drizzle some of the balsamic reduction on pizzas. 
- Place pizza directly on oven rack. (I actually put mine on a cookie sheet to keep my oven clean--still worked just fine!)
- Bake for about 10 minutes or until cheese is melted.
- Remove pizza from the oven.
- Top with basil and drizzle with balsamic reduction.
- Cut into slices and serve with peach slices on the side. 

And again, we have a delicious dish! Both of these are super easy and husband-approved! Enjoy the last couple weeks of summer!